Questions to answer after the test is done:
What happened? How did it go? Were these the results that you predicted/ expected to happen?
Post video of test being done
Whats your next step?
Morgan's Chemistry Blog |
|
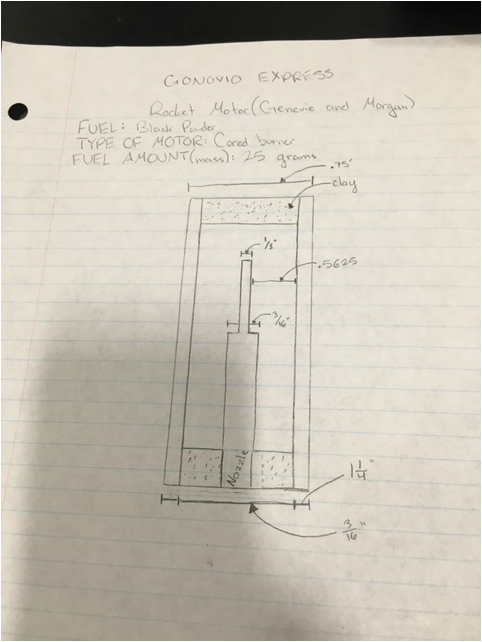
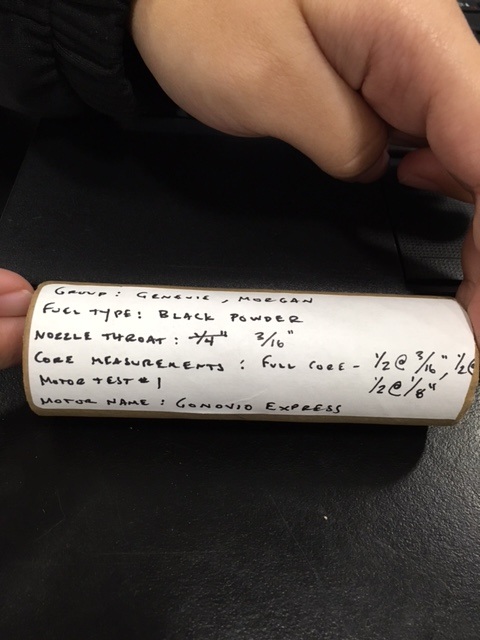
Today, we tested our rocket motor design. Andrew manufactured the motors at home and brought them to school. Then we walked to the bay and set up the testing equipment and thrust scale. We used a GoPro to film the test and thrust scale. When we tested our motor it started out really great. Then too much pressure built up in the motor and it CATO or exploded. Since it CATO we won't be able to use our motor for our final rocket motor design. It reached a very high thrust before it CATO, at 2996 grams of thrust.
Questions to answer after the test is done: What happened? How did it go? Were these the results that you predicted/ expected to happen? Post video of test being done Whats your next step?
0 Comments
11/2 Monday - Make two week plan, prepare for motor test
11/3 Tuesday - Guided Activity/ Rocket Motor test 11/4 Wednesday - Do rocket motor test and/or blog rocket motor test results 11/5 Thursday - Gone for college day 11/6 Friday - College Day 11/9 Monday - Make thrust curve 11/10 Tuesday - Guided activity 11/11 Wednesday - No School / Veterans Day 11/12 Thursday - Work on blog and blog Tuesday's guided activity 11/13 Friday - Work on blog, make sure everything is complete Here is our final rocket motor design. It is a black powder cored burner. We chose to core it in a unique way, where one half of it is cored at with a thicker drill bit and the other with a thinner drill bit. The reason for doing that is so when the rocket first takes off it will have more power, then as the fuel starts to burn up, it slows down when it hits the smaller core. We wanted to try doing it this way so we can make our rocket go higher. Since, no one has really tried this kind of motor, we are excited to see the outcome of it and if it actually works like we predicted.
The next step is the actually manufacture the rocket, which will be done by Andrew. Then we are doing to test the motor and measure the thrust that is created when the motor is set off. Once we get that data we are going to create a thrust curve, which is basically just showing how much thrust the motor gives off at certain point during the launch. Today we did a lab where we conducted a combustion reaction and learned about the periodic table. First Andrew walked us through what a chemical reaction is and the atomic structure of atoms. We learned how to read the periodic table, and be able to look at an element and know the number of electrons that element has. Once, you know that, you can predict the outcome of what will happen if you put those two elements together. Then we learned about water, or H20, since that is what we were going to try to make. Since H20 is created with 2 hydrogens and 1 oxygen, our goal was to combine those elements. First, we got a flask filled about 1/3 of the way with tap water. Then we dissolved citric acid into the water. The purpose of this was to dissolve small magnesium film, which produces hydrogen when mixed with an acid, like citric acid. Then we quickly put the magnesium into the solution and put a balloon over the top of the flask to capture the hydrogen produced with the magnesium dissolved. When the magnesium was dissolving the flask got really warm, which is normal for that reaction. Once all of the magnesium dissolved our balloon was full of pure hydrogen. The next step is to put the balloon on an open flame. We lit a candle on the table and put the balloon, then slowly lowered the balloon onto the flame. Once the balloon reacted with the flame, we felt the balloon and it was wet, which was the water created when the balloon combusted. This lab was important because it helped me understand the periodic table a little more, as well as teach me how combustion reactions take place. I liked having a facilitated lab, because I feel that I learned a lot and I understood what was going on. It was also nice having an actual teacher, teaching me about the subject rather than just researching it all. I worked with Genevie when for this mini lab. Since, I have worked with her in the past, I know that we work very well together and we can share the jobs that need to be done. We took turns doing different things, so this lab worked out really well. I think that this lab definitely helped me learn more about rockets. Since we are designing our own motors it was very helpful to learn about combustion reactions since that is exactly what will be happening inside the motor when we set the rocket off. By understanding how combustion reactions work we can use that knowledge to figure out how to construct our motors. If we were to continue this lab, we could further work with hydrogen and different combustion reactions. If you research the periodic table more so you understand it a little better, you can predict the outcome of mixing two elements together and finding out what happens when actually do the experiment. The three most common types of propellants are compressed powder, usually black powder, sugar propellant (most commonly sucrose, dextrose and most recently, sorbitol) and composite propellant using ammonium nitrate or ammonium perchlorate as the oxidizer and a powdered metal (usually aluminum or magnesium) as the fuel). Compressed propellant is prepared dry but may be wet at some stage of the preparation. It is loaded into the motor casing by compressing with constant mechanical or hydraulic pressure or by impact such as by blows of a mallet or hammer. The burn rate depends on how fine the components are ground, how intimately it is mixed, and the density which is determined by how much it is compressed. Black powder is made from Potassium Nitrate (KNO3), Charcoal and Sulfur. The common ratio is 75:15:10. Like zinc-sulfur, the burn rate depends on the particle size and how much it is compressed. Black powder can be used used as a propellant with more consistency than zinc-sulfur and is the propellant used in small commercial model rocket engines. End burner VS Core burner: End burners are used because they are reliable and easy to manufacture. While core burners can be a little less reliable and if something on your rocket is off, it can cause the rocket to CATO. Core burners usually have the ability to lift more payload, giving a stronger thrust, although it doesn't last as long. An end burner will last longer, but not giving as much thrust, thus it won't be able to lift as big of a payload. A cored rocket motor is the traditional motor, typically with a clay nozzle, and a hollow core going up through the nozzle and into the fuel grain for some distance. Ignition starts at the core’s forward end. and instantly spreads to the rear, lighting the length of the core as it goes. From that point on the flame spreads outward in the shape of an expanding cylinder, consuming the last of the propellant as it reaches the inside of the casing wall. In motors with small nozzles and short cores, the chamber pressure and thrust start out low and reach their maximums at burnout. In motors with larger nozzles and longer cores the initial values are higher. In motors with very large nozzles and very long cores the starting pressure and starting thrust can exceed 50% of their maximums.
A motor’s core length is critical because it directly controls the amount of propellant burning at any given moment. If the core is too short, the motor performs poorly. If the core is too long, the maximum chamber pressure can exceed the motor’s design limits, and cause the motor to explode. Because the burning surface in a core burner is larger than the burning surface in an end burner, a core burner requires a slower burning propellant. Because the distance that the flame travels is short (from the edge of the core to the inside of the casing wall), small core burners have comparatively short burn times. All core burners have the advantage that the layer of unburned propellant between the flame and the casing wall insulates the casing from the heat of the flame until the final moments of the burn. 10/19 Monday - Make plan for the next 2 weeks
10/20 Tuesday - Research Candles 10/21 Wednesday - Make Candles 10/22 Thursday - Research Rocket Motors 10/23 Friday - Finish rocket motor research 10/26 Monday - No School (Staff day) 10/27 Tuesday - Guided Activity (50pts) 10/28 Wednesday - Design and get rocket motor approved 10/29 Thursday - Rocks Phase 1 10/30 Friday - Work on blog End of 2 weeks reflection: I think for the most part I followed my plan pretty well. One thing that didn't happen is I did not make candles. After learning how many points the rocket motors were worth, I figured I didn't need to make candles and I could spend more time working on researching and designing my rocket motor. So over these two weeks I have researched rocket motors and turned in my final rocket motor design, the combustion reaction guided activity, and 2 different worksheets. I think I am in a good place with the amount of points and I will certainly have at least 250 by the end of the next two weeks. This was the rocket project that we did as a class. I chose to participate in it because I know that I have done rocketry in the past, but this was a new kind using new materials, so I was interested in learning about it and trying it out. I think that our rocket was one of the most successful ones that the class launched. To launch our rockets we took a trip to fiesta island during chemistry class because that is one of the few places we are legally allowed to do it. Before we left we put the actual motor as well as the recovery wadding into the rocket. When we were launched ours there was a small problem at first. The launch lug, which keeps the rocket straight when its launched, was getting caught and causing too much friction. So Andrew, spent a little bit of time getting them to work correctly. But we did the actual launch ours worked perfectly and actually went very high and drifted far, as the parachute came out and worked as planned. Genevie and I spent a few days building the rocket. This was not a very high level rocket so it didn't take long to complete. The thing that took the longest was letting the glue dry. The directions were a bit confusing, but after asking a few people for help we completed the rocket successfully. I think that I performed well in this project. I was actually interested in learning how to build this kind of rocket and how it actually worked. For the most part, we stayed on task on got this work done, as well as our others labs and working on our blog. If I could do this project again I would have done the engine mount a little differently, since when we put the engine in, it didn't fit exactly like it was supposed to. Even though, in the end the rocket still launched perfectly. I think there would be many ways to continue this project. We could do a scratch build rocket, as well as build more complicated and bigger rockets. I think I might possibly continue this is the next section depending on what I have planned to work on. For this project I learned how a rocket is built and launched. I learned about all the different components in the rocket and new terms that went along with building and launching it. I will definitely continue to use this information if I build rockets again and/or continue the project into Section 3. I think that I also learned more about rocketry and continued the skills that I already knew from previously doing rockets. For this lab we made bath bombs! Bath bombs are things that react with water, when you are taking a bath. Many people use them, so Genevie and I thought it would be interesting to try and make our own and see how they work. First, we did some background research to learn the science of how they work how how to actually make them. Overall, this experiment was a success. I feel that I learned some new things as well as the experiment go the way that we planned it. When we did the actual reaction by placing the bombs in the water, they didn't the exact way that we thought they would, but they still fizzed and dissolved. What happened is that when the citric acid and sodium bicarbonate are exposed to water they react by fizzing which produces carbon dioxide mixing the other ingredients in the bath bomb with the water. For the most part, we did get desirable results with this lab. One thing I think we did make a mistake on was, when we were mixing the ingredients together, we added the water too fast. The problem with that was when we added the water, too much at a time, the other ingredients reacted very strongly with the water. The reason we needed to do it slowly would be so that they are not as exposed to the water. I think that I performed well in this lab. I definitely but a good amount of effort into as well as stayed on task and followed through with my plans. I worked with Genevie for this lab. Since, we have worked together on previous labs we knew that we could work well together and get our work done. Like I said before, if I could redo this lab I would have added the water slower so the bombs were not as bubbly and fizzed longer instead of dissolving so quickly. I would also have used food coloring, so the bath bombs were actually colored. The reason we didn't use them in the first place was because neither of us had any and the class colors were misplaced. If we wanted to continue this lab, maybe we could fix the mistakes we made. We could also try a different smell or mold shape. Today we did a small lab where we learned about how to measure things. We focused on answering questions like, What is the density of helium? and How can we characterize helium?
First we did some background research, which was mostly Andrew telling us about measuring different things and how it works. These are exact measurements that never change: Length: meter (m) Volume : liter (L) = 1dm^3 Mass: Gram (g) = 1cm^3 of H2O = 1mL (also cc (cubic centimeters) Time: Seconds (s) Amount of Stuff: Mole (mol) Temperature: Kelvin (k) - Degrees Celcius + 273.15 = k Ratios and Comparisons: Velocity: Distance/Time = d/t = m/s - if you know at least two of the components you can find the missing one Molarity: mol/L - for a solution Density: mass/volume = g/mL - Buoyancy = level to which two substances density's match Everything comes down to understanding density After learning our background research we did the actual experiment to find the density of helium. To find this we filled a small balloon with helium. Then we had to make the balloon the same density as the normal air. To do this we added mass, by sticking tape on the balloon to make it buoyant with the air. Density of air = .001225 g/gm^3 Volume of a sphere = 4/3 (pi) r^3 = 2572.44cm^3 Then we weighed the balloon and tape on a gram scale ( The scale was not sensitive enough so we had to estimate) Balloon + Tape = 2.5g + Helium = 3.15g Helium = .65g .001225g/1cm^3 (2572.44cm^3) =3.151239 g = .00025g --------------- cm^3 The main challenge in this activity was see how you can measure something that is lighter than air and that since helium still has mass and volume we can still measure it. By doing the calculations to figure out this lab, we got a much more exact answer. I learned more about how to characterize an element and terms on measuring. If we could redo the experiment we would have used a bigger balloon so it would be easier to measure as well as have a more sensitive scale to weigh the balloon and tape. |
MorganHi. I am a sophomore at High Tech High in San Diego,CA. This is my chemistry blog that I will be posting on for my first semester. Enjoy! Archives
December 2015
|